This check in offers alpha support for per process metrics, you can view threads, process CPU usage over time, IO, memory, CPU time, parent process, command, uptime and journal entries. This is unfinished but all major functionality is available and I wanted to make it available to feedback and testing. |
||
|---|---|---|
| .githooks | ||
| .github/workflows | ||
| docs | ||
| proto | ||
| scripts | ||
| socktop | ||
| socktop_agent | ||
| socktop_connector | ||
| socktop_wasm_test | ||
| zellij_socktop_plugin | ||
| .gitignore | ||
| Cargo.lock | ||
| Cargo.toml | ||
| LICENSE | ||
| nohup.out | ||
| README.md | ||
| rust-toolchain.toml | ||
| test_thiserror.rs | ||
socktop
socktop is a remote system monitor with a rich TUI, inspired by top/btop, talking to a lightweight agent over WebSockets.
- Linux agent: near-zero CPU when idle (request-driven, no always-on sampler)
- TUI: smooth graphs, sortable process table, scrollbars, readable colors

Features
- Remote monitoring via WebSocket (JSON over WS)
- Optional WSS (TLS): agent auto‑generates a self‑signed cert on first run; client pins the cert via --tls-ca/-t
- TUI built with ratatui
- CPU
- Overall sparkline + per-core mini bars
- Accurate per-process CPU% (Linux /proc deltas), normalized to 0–100%
- Memory/Swap gauges with human units
- Disks: per-device usage
- Network: per-interface throughput with sparklines and peak markers
- Temperatures: CPU (optional)
- Top processes (top 50)
- PID, name, CPU%, memory, and memory%
- Click-to-sort by CPU% or Mem (descending)
- Scrollbar and mouse/keyboard scrolling
- Total process count shown in the header
- Only top-level processes listed (threads hidden) — matches btop/top
- Optional GPU metrics (can be disabled)
- Optional auth token for the agent
Prerequisites: Install Rust (rustup)
Rust is fast, safe, and cross‑platform. Installing it will make your machine better. Consider yourself privileged.
Linux/macOS:
curl --proto '=https' --tlsv1.2 -sSf https://sh.rustup.rs | sh
# load cargo for this shell
source "$HOME/.cargo/env"
# ensure stable is up to date
rustup update stable
rustc --version
cargo --version
# after install you may need to reload your shell, e.g.:
exec bash   # or: exec zsh / exec fish
Windows (for the brave): install from https://rustup.rs with the MSVC toolchain. Yes, you’ll need Visual Studio Build Tools. You chose Windows — enjoy the ride.
Raspberry Pi / Ubuntu / PopOS (required)
Install GPU support with apt command below
sudo apt-get update
sudo apt-get install libdrm-dev libdrm-amdgpu1
Additional note for Raspberry Pi users. Please update your system to use the newest kernel available through app, kernel version 6.6+ will use considerably less overall CPU to run the agent. For example on a rpi4 the kernel < 6.6 the agent will consume .8 cpu but on the same hardware on > 6.6 the agent will consume only .2 cpu. (these numbers indicate continuous polling at web socket endpoints, when not in use the usage is 0)
Architecture
Two components:
-
Agent (remote): small Rust WS server using sysinfo + /proc. It collects metrics only when the client requests them over the WebSocket (request-driven). No background sampling loop.
-
Client (local): TUI that connects to ws://HOST:PORT/ws (or wss://HOST:PORT/ws when TLS is enabled) and renders updates.
Quick start
- Build both binaries:
git clone https://github.com/jasonwitty/socktop.git
cd socktop
cargo build --release
- Start the agent on the target machine (default port 3000):
./target/release/socktop_agent --port 3000
- Connect with the TUI from your local machine:
./target/release/socktop ws://REMOTE_HOST:3000/ws
Cross-compiling for Raspberry Pi
For Raspberry Pi and other ARM devices, you can cross-compile the agent from a more powerful machine:
- Cross-compilation guide - Instructions for cross-compiling from Linux, macOS, or Windows hosts
Quick demo (no agent setup)
Spin up a temporary local agent on port 3231 and connect automatically:
socktop --demo
Or just run socktop with no arguments and pick the built‑in demo entry from the interactive profile list (if you have saved profiles, demo is appended). The demo agent:
- Runs locally (
ws://127.0.0.1:3231/ws) - Stops automatically (you'll see "Stopped demo agent on port 3231") when you quit the TUI or press Ctrl-C
Install (from crates.io)
You don’t need to clone this repo to use socktop. Install the published binaries with cargo:
# TUI (client)
cargo install socktop
# Agent (server)
cargo install socktop_agent
This drops socktop and socktop_agent into ~/.cargo/bin (add it to PATH).
Notes:
- After installing Rust via rustup, reload your shell (e.g., exec bash) so cargo is on PATH.
- Windows: you can also grab prebuilt EXEs from GitHub Actions artifacts if rustup scares you. It shouldn’t. Be brave.
System-wide agent (Linux)
# If you installed with cargo, binaries are in ~/.cargo/bin
sudo install -o root -g root -m 0755 "$HOME/.cargo/bin/socktop_agent" /usr/local/bin/socktop_agent

# Install and enable the systemd service (example unit in docs/)
sudo install -o root -g root -m 0644 docs/socktop-agent.service /etc/systemd/system/socktop-agent.service
sudo systemctl daemon-reload
sudo systemctl enable --now socktop-agent
# Enable SSL

# Stop service
sudo systemctl stop socktop-agent

# Edit service to append SSL option and port
sudo micro /etc/systemd/system/socktop-agent.service

--
ExecStart=/usr/local/bin/socktop_agent --enableSSL --port 8443
--

# Reload
sudo systemctl daemon-reload

# Restart
sudo systemctl start socktop-agent

# check logs for certificate location
sudo journalctl -u socktop-agent -f

--
Aug 22 22:25:26 rpi-master socktop_agent[2913998]: socktop_agent: generated self-signed TLS certificate at /var/lib/socktop/.config/socktop_agent/tls/cert.pem
--
Usage
Agent (server):
socktop_agent --port 3000
# or env: SOCKTOP_PORT=3000 socktop_agent
# optional auth: SOCKTOP_TOKEN=changeme socktop_agent
# enable TLS (self‑signed cert, default port 8443; you can also use -p):
socktop_agent --enableSSL --port 8443
Client (TUI):
socktop ws://HOST:3000/ws
# with token:
socktop "ws://HOST:3000/ws?token=changeme"
# TLS with pinned server certificate (recommended over the internet):
socktop --tls-ca /path/to/cert.pem wss://HOST:8443/ws
# (By default hostname/SAN verification is skipped for ease on home networks. To enforce it add --verify-hostname)
socktop --verify-hostname --tls-ca /path/to/cert.pem wss://HOST:8443/ws
# shorthand:
socktop -t /path/to/cert.pem wss://HOST:8443/ws
# Note: providing --tls-ca/-t automatically upgrades ws:// to wss:// if you forget
Intervals (client-driven):
- Fast metrics: ~500 ms
- Processes: ~2 s
- Disks: ~5 s
The agent stays idle unless queried. When queried, it collects just what’s needed.
Connection Profiles (Named)
You can save frequently used connection settings (URL + optional TLS CA path) under a short name and reuse them later.
Config file location:
- Linux (XDG):
$XDG_CONFIG_HOME/socktop/profiles.json - Fallback (when XDG not set):
~/.config/socktop/profiles.json
Creating a profile
First time you specify a new --profile/-P name together with a URL (and optional --tls-ca), it is saved automatically:
socktop --profile prod ws://prod-host:3000/ws
# With TLS pinning:
socktop --profile prod-tls --tls-ca /path/to/cert.pem wss://prod-host:8443/ws

You can also set custom intervals (milliseconds):

```bash
socktop --profile prod --metrics-interval-ms 750 --processes-interval-ms 3000 ws://prod-host:3000/ws
If a profile already exists you will be prompted before overwriting:
$ socktop --profile prod ws://new-host:3000/ws Overwrite existing profile 'prod'? [y/N]: y
To overwrite without an interactive prompt pass `--save`:

```bash
socktop --profile prod --save ws://new-host:3000/ws
Using a saved profile
Just pass the profile name (no URL needed):
socktop --profile prod
socktop -P prod-tls      # short flag
The stored URL (and TLS CA path, if any) plus any saved intervals will be used. TLS auto-upgrade still applies if a CA path is stored alongside a ws:// URL.
Interactive selection (no args)
If you run socktop with no arguments and at least one profile exists, you will be shown a numbered list to pick from:
$ socktop
Select profile:
  1. prod
  2. prod-tls
Enter number (or blank to abort): 2
Choosing a number starts the TUI with that profile. A built‑in demo option is always appended; selecting it launches a local agent on port 3231 (no TLS) and connects to ws://127.0.0.1:3231/ws. Pressing Enter on blank aborts without connecting.
JSON format
An example profiles.json (pretty‑printed):
{
  "profiles": {
    "prod": { "url": "ws://prod-host:3000/ws" },
    "prod-tls": {
      "url": "wss://prod-host:8443/ws",
      "tls_ca": "/home/user/certs/prod-cert.pem",
      "metrics_interval_ms": 500,
      "processes_interval_ms": 2000
    }
  },
  "version": 0
}
Notes:
- The
tls_capath is stored as given; if you move or rotate the certificate update the profile by re-running with--profile NAME --save. - Deleting a profile: edit the JSON file and remove the entry (TUI does not yet have an in-app delete command).
- Profiles are client-side convenience only; they do not affect the agent.
- Intervals:
metrics_interval_mscontrols the fast metrics poll (default 500 ms).processes_interval_mscontrols process list polling (default 2000 ms). Values below 100 ms (metrics) or 200 ms (processes) are clamped.
Updating
Update the agent (systemd):
# on the server running the agent
cargo install socktop_agent --force
sudo systemctl stop socktop-agent
sudo install -o root -g root -m 0755 "$HOME/.cargo/bin/socktop_agent" /usr/local/bin/socktop_agent
# if you changed the unit file:
# sudo install -o root -g root -m 0644 docs/socktop-agent.service /etc/systemd/system/socktop-agent.service
# sudo systemctl daemon-reload
sudo systemctl start socktop-agent
sudo systemctl status socktop-agent --no-pager
# logs:
# journalctl -u socktop-agent -f
Update the TUI (client):
cargo install socktop --force
socktop ws://HOST:3000/ws
Tip: If only the binary changed, restart is enough. If the unit file changed, run sudo systemctl daemon-reload.
Configuration (agent)
- Port:
- Flag: --port 8080 or -p 8080
- Positional: socktop_agent 8080
- Env: SOCKTOP_PORT=8080
- TLS (self‑signed):
- Enable: --enableSSL
- Default TLS port: 8443 (override with --port/-p)
- Certificate/Key location (created on first TLS run):
- Linux (XDG): $XDG_CONFIG_HOME/socktop_agent/tls/{cert.pem,key.pem} (defaults to ~/.config)
- The agent prints these paths on creation.
- You can set XDG_CONFIG_HOME before first run to control where certs are written.
- Additional SANs: set
SOCKTOP_AGENT_EXTRA_SANS(comma‑separated) before first TLS start to include extra IPs/DNS names in the cert. Example:
This prevents client errors likeSOCKTOP_AGENT_EXTRA_SANS="192.168.1.101,myhost.internal" socktop_agent --enableSSLNotValidForNamewhen connecting via an IP not present in the default cert SAN list. - Expiry / rotation: the generated cert is valid for ~397 days from creation. If the agent fails to start with an "ExpiredCertificate" error (or your client reports expiry), simply delete the existing cert and key:
On next TLS start the agent will generate a fresh pair. Only distribute the new cert.pem to clients (never the key).rm ~/.config/socktop_agent/tls/cert.pem ~/.config/socktop_agent/tls/key.pem # (adjust path if XDG_CONFIG_HOME is set or different user) systemctl restart socktop-agent # if running under systemd
- Auth token (optional): SOCKTOP_TOKEN=changeme
- Disable GPU metrics: SOCKTOP_AGENT_GPU=0
- Disable CPU temperature: SOCKTOP_AGENT_TEMP=0
Keyboard & Mouse
- Quit: q or Esc
- Processes pane:
- Click “CPU %” to sort by CPU descending
- Click “Mem” to sort by memory descending
- Mouse wheel: scroll
- Drag scrollbar: scroll
- Arrow/PageUp/PageDown/Home/End: scroll
Example agent JSON
{
  "cpu_total": 12.4,
  "cpu_per_core": [11.2, 15.7],
  "mem_total": 33554432,
  "mem_used": 18321408,
  "swap_total": 0,
  "swap_used": 0,
  "process_count": 127,
  "hostname": "myserver",
  "cpu_temp_c": 42.5,
  "disks": [{"name":"nvme0n1p2","total":512000000000,"available":320000000000}],
  "networks": [{"name":"eth0","received":12345678,"transmitted":87654321}],
  "top_processes": [
    {"pid":1234,"name":"nginx","cpu_usage":1.2,"mem_bytes":12345678}
  ],
  "gpus": null
}
Notes:
- process_count is merged into the main metrics on the client when processes are polled.
- top_processes are the current top 50 (sorting in the TUI is client-side).
Security
Set a token on the agent and pass it as a query param from the client:
Server:
SOCKTOP_TOKEN=changeme socktop_agent --port 3000
Client:
socktop "ws://HOST:3000/ws?token=changeme"
TLS / WSS
For encrypted connections, enable TLS on the agent and pin the server certificate on the client.
Server (generates self‑signed cert and key on first run):
socktop_agent --enableSSL --port 8443
Client (trust/pin the server cert; copy cert.pem from the agent):
socktop --tls-ca /path/to/agent/cert.pem wss://HOST:8443/ws
Notes:
- Do not copy the private key off the server; only the cert.pem is needed by clients.
- When --tls-ca/-t is supplied, the client auto‑upgrades ws:// to wss:// to avoid protocol mismatch.
- Hostname (SAN) verification is DISABLED by default (the cert is still pinned). Use
--verify-hostnameto enable strict SAN checking. - You can run multiple clients with different cert paths by passing --tls-ca per invocation.
Using tmux to monitor multiple hosts
You can use tmux to show multiple socktop instances in a single terminal.
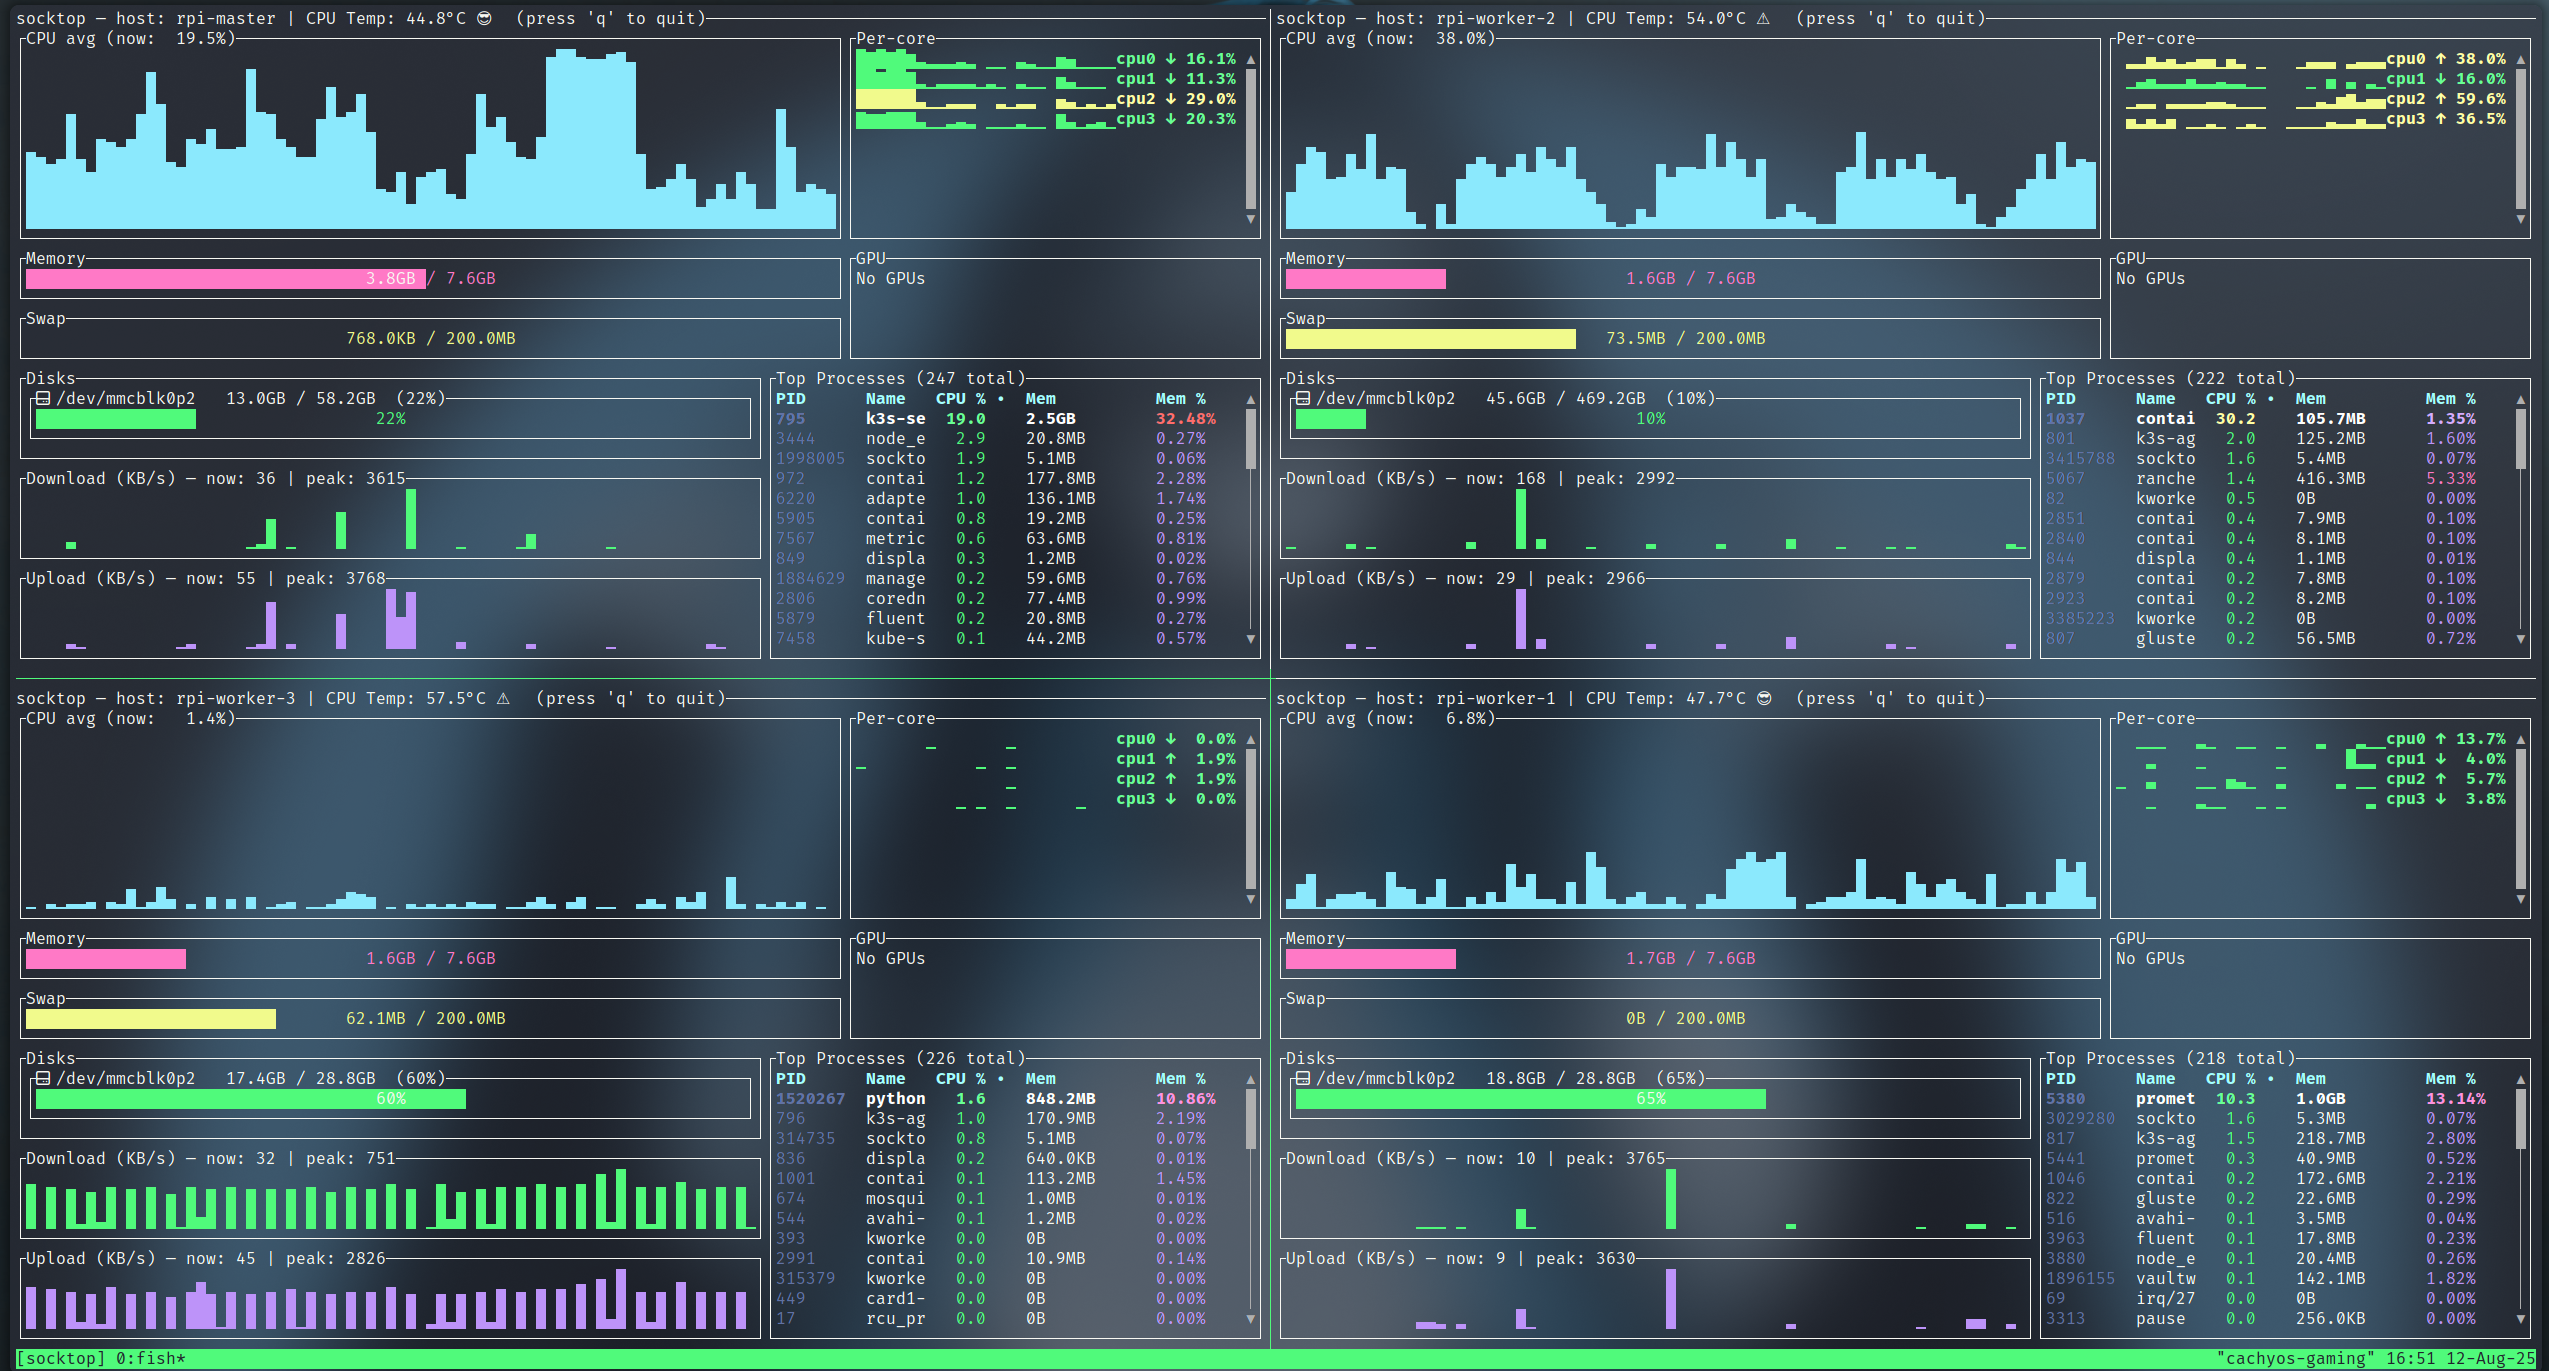 monitoring 4 Raspberry Pis using Tmux
Prerequisites:
- Install tmux (Ubuntu/Debian:
sudo apt-get install tmux)
Key bindings (defaults):
- Split left/right: Ctrl-b %
- Split top/bottom: Ctrl-b "
- Move between panes: Ctrl-b + Arrow keys
- Show pane numbers: Ctrl-b q
- Close a pane: Ctrl-b x
- Detach from session: Ctrl-b d
Two panes (left/right)
- This creates a session named "socktop", splits it horizontally, and starts two socktops.
tmux new-session -d -s socktop 'socktop ws://HOST1:3000/ws' \; \
  split-window -h 'socktop ws://HOST2:3000/ws' \; \
  select-layout even-horizontal \; \
  attach
Four panes (top-left, top-right, bottom-left, bottom-right)
- This creates a 2x2 grid with one socktop per pane.
tmux new-session -d -s socktop 'socktop ws://HOST1:3000/ws' \; \
  split-window -h 'socktop ws://HOST2:3000/ws' \; \
  select-pane -t 0 \; split-window -v 'socktop ws://HOST3:3000/ws' \; \
  select-pane -t 1 \; split-window -v 'socktop ws://HOST4:3000/ws' \; \
  select-layout tiled \; \
  attach
Tips:
- Replace HOST1..HOST4 (and ports) with your targets.
- Reattach later:
tmux attach -t socktop
Platform notes
- Linux: fully supported (agent and client).
- Raspberry Pi:
- 64-bit: aarch64-unknown-linux-gnu
- 32-bit: armv7-unknown-linux-gnueabihf
- Windows:
- TUI + agent can build with stable Rust; bring your own MSVC. You’re on Windows; you know the drill.
- CPU temperature may be unavailable.
- binary exe for both available in build artifacts under actions.
- macOS:
- TUI works; agent is primarily targeted at Linux. Agent will run just fine on macos for debugging but I have not documented how to run as a service, I may not given the "security" feautures with applications on macos. We will see.
Development
cargo fmt
cargo clippy --all-targets --all-features
cargo run -p socktop -- ws://127.0.0.1:3000/ws
# TLS (dev): first run will create certs under ~/.config/socktop_agent/tls/
cargo run -p socktop_agent -- --enableSSL --port 8443
Auto-format on commit
A sample pre-commit hook that runs cargo fmt --all is provided in .githooks/pre-commit.
Enable it (one-time):
git config core.hooksPath .githooks
chmod +x .githooks/pre-commit
Every commit will then format Rust sources and restage them automatically.
Roadmap
- Agent authentication (token)
- Hide per-thread entries; only show processes
- Sort top processes in the TUI
- Configurable refresh intervals (client)
- Export metrics to file
- TLS / WSS support (self‑signed server cert + client pinning)
- Split processes/disks to separate WS calls with independent cadences (already logical on client; formalize API)
- Outage notifications and reconnect.
- Per process detailed statistics pane
- cleanup of Disks section, properly display physical disks / partitions, remove duplicate entries
License
MIT — see LICENSE.
Acknowledgements
- ratatui for the TUI
- sysinfo for system metrics
- tokio-tungstenite for WebSockets