| .github/workflows | ||
| .vscode | ||
| docs | ||
| socktop | ||
| socktop_agent | ||
| .gitignore | ||
| Cargo.lock | ||
| Cargo.toml | ||
| README.md | ||
socktop
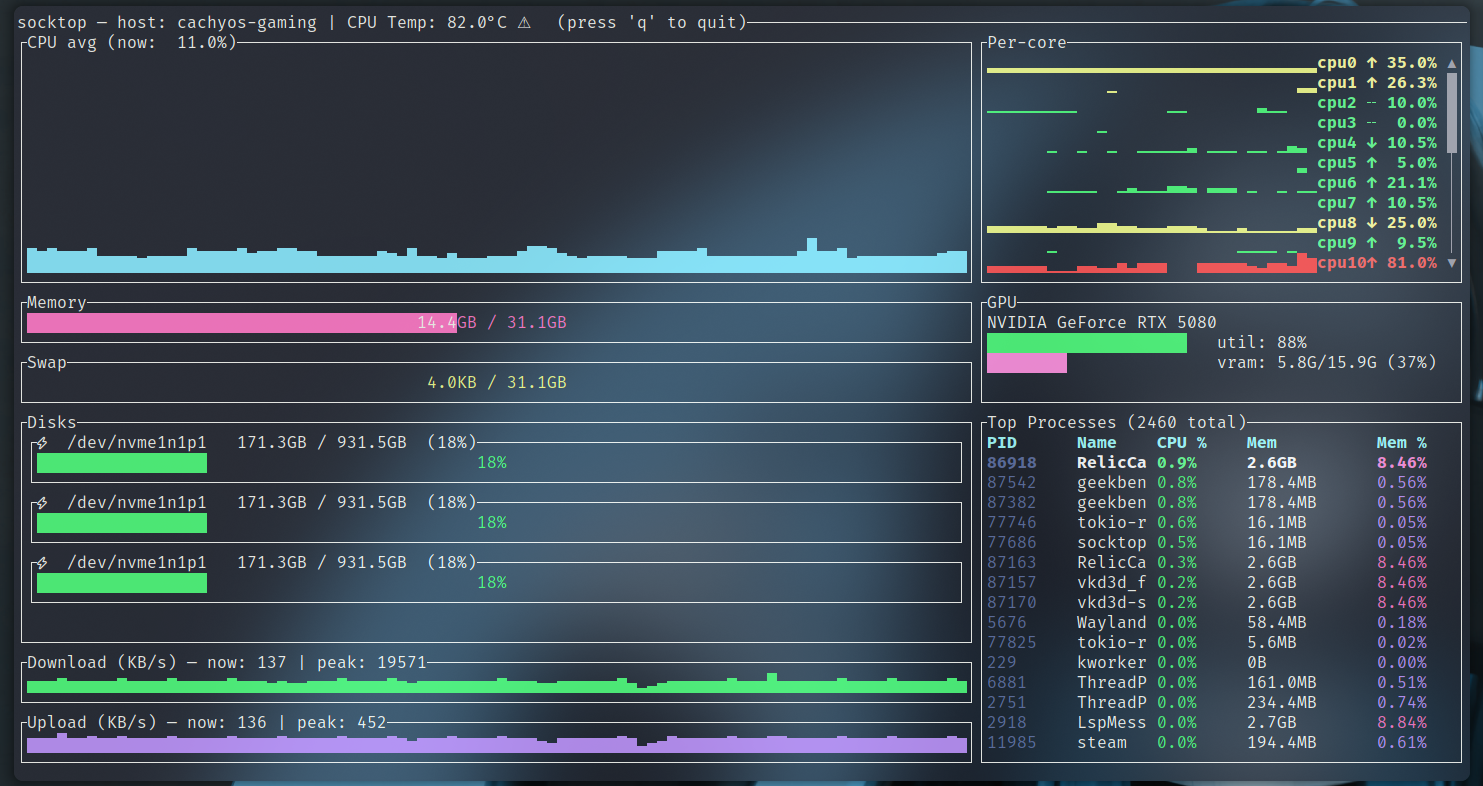
socktop is a remote system monitor with a rich TUI interface, inspired by top and btop, that communicates with a lightweight remote agent over WebSockets.
It lets you watch CPU, memory, disks, network, temperatures, and processes on another machine in real-time — from the comfort of your terminal.
Features
- 📡 Remote monitoring via WebSocket — lightweight agent sends JSON metrics
- 🖥 Rich TUI built with ratatui
- 🔍 Detailed CPU view — per-core history, current load, and trends
- 📊 Memory, Swap, Disk usage — human-readable units, color-coded
- 🌡 Temperatures — CPU temperature with visual indicators
- 📈 Network throughput — live sparkline graphs with peak tracking
- 🏷 Top processes table — PID, name, CPU%, memory, and memory%
- 🎨 Color-coded load, zebra striping for readability
- ⌨ Keyboard shortcuts:
q/Esc→ Quit
Architecture
socktop has two components:
-
Agent (remote side)
A small Rust WebSocket server that runs on the target machine and gathers metrics via sysinfo. -
Client (local side)
The TUI app (socktop) that connects to the agent’s/wsendpoint, receives JSON metrics, and renders them.
The two communicate over a persistent WebSocket connection.
Adaptive (idle-aware) sampling
The socktop agent now samples system metrics only when at least one WebSocket client is connected. When idle (no clients), the sampler sleeps and CPU usage drops to ~0%.
How it works
- The WebSocket handler increments/decrements a client counter in
AppStateon connect/disconnect. - A background sampler wakes when the counter transitions from 0 → >0 and sleeps when it returns to 0.
- The most recent metrics snapshot is cached as JSON for fast responses.
Cold start behavior
- If a client requests metrics while the cache is empty (e.g., just started or after a long idle), the agent performs a one-off synchronous collection to respond immediately.
Tuning
- Sampling interval (active): update
spawn_sampler(state, Duration::from_millis(500))insocktop_agent/src/main.rs. - Always-on or low-frequency idle sampling: replace the “sleep when idle” logic in
socktop_agent/src/sampler.rswith a low-frequency interval. Example sketch:
// In sampler.rs (sketch): sample every 10s when idle, 500ms when active
let idle_period = Duration::from_secs(10);
loop {
    let active = state.client_count.load(Ordering::Relaxed) > 0;
    let period = if active { Duration::from_millis(500) } else { idle_period };
    let mut ticker = tokio::time::interval(period);
    ticker.tick().await;
    if !active {
        // wake early if a client connects
        tokio::select! {
            _ = ticker.tick() => {},
            _ = state.wake_sampler.notified() => continue,
        }
    }
    let m = collect_metrics(&state).await;
    if let Ok(js) = serde_json::to_string(&m) {
        *state.last_json.write().await = js;
    }
}
Installation
Prerequisites
- Rust 1.75+ (recommended latest stable)
- Cargo package manager
curl --proto '=https' --tlsv1.2 -sSf https://sh.rustup.rs | sh
Raspberry Pi (required)
- Install GPU support with apt command below
sudo apt-get update
sudo apt-get install libdrm-dev libdrm-amdgpu1
Install with cargo
Installing with the cargo package manager is the easiest way to install the latest stable version. The cargo package manager comes installed with rustup. Rust is the best programming language ever to be created. If you don't have, you should. Copy and past the sh script line from the prerequisites section above to setup.
Note: You will need to reload your shell after installation of rustup to do this use the exec command. (example: exec bash, exec fish, exec sh) Note for windows users: You will need Visual Studio Community edition installed with C++ build tools in order to compile. Don't be salty about it, your the one using windows.
the commands below will install both the TUI and the agent. Both are stand alone capable, if you are on a remote server and never plan to run the TUI from that server you can only install the agent. Likewise if you dont plan to inspect performance on your local machine you can only install socktop. The agent will by default not do anything without a socket connection, so generally its fine to install on your local machine as it will use very minimal resources waiting for a socket connection.
cargo install socktop
cargo install socktop_agent
copy to a system path:
If you plan to run the agent as a systemd service (linux), execute the following:
sudo cp ~/.cargo/bin/socktop_agent /usr/local/bin/
Create service account (optional but recommended)
sudo groupadd --system socktop || true
sudo useradd  --system --gid socktop --create-home \
  --home-dir /var/lib/socktop --shell /usr/sbin/nologin socktop || true
Create unit file
sudo tee /etc/systemd/system/socktop-agent.service > /dev/null <<'EOF'
[Unit]
Description=Socktop Agent
After=network.target

[Service]
Type=simple
User=socktop
Group=socktop
# If you did NOT copy to /usr/local/bin, change ExecStart to /home/USERNAME/.cargo/bin/socktop_agent
ExecStart=/usr/local/bin/socktop_agent --port 3000
# Environment=SOCKTOP_TOKEN=changeme   # uncomment and set if using auth
Restart=on-failure
RestartSec=2
AmbientCapabilities=CAP_NET_BIND_SERVICE
NoNewPrivileges=true
LimitNOFILE=65535
WorkingDirectory=/var/lib/socktop

[Install]
WantedBy=multi-user.target
EOF
Reload and enable
sudo systemctl daemon-reload
sudo systemctl enable --now socktop-agent
Update after cargo release
cargo install socktop_agent --force
sudo cp ~/.cargo/bin/socktop_agent /usr/local/bin/
sudo systemctl restart socktop-agent
Build from source
git clone https://github.com/jasonwitty/socktop.git
cd socktop
cargo build --release
Install as a cargo binary
cargo install --path ./socktop/
cargo install --path ./socktop_agent/
This will install the socktop binary into ~/.cargo/bin.
Running
1. Start the agent on the remote machine
The agent binary listens on a TCP port and serves /ws:
socktop_agent -p 3031
Tip: You can run the agent under
systemd, inside a Docker container, or just in a tmux/screen session.
2. Connect with the client
From your local machine:
socktop ws://REMOTE_HOST:8080/ws
Example:
socktop ws://192.168.1.50:8080/ws
Usage
When connected, socktop displays:
Left column:
- CPU avg graph — sparkline of recent overall CPU usage
- Memory gauge — total and used RAM
- Swap gauge — total and used swap
- Disks — usage per device (only devices with available space > 0)
- Network Download/Upload — sparkline in KB/s, with current & peak values
Right column:
- Per-core history & trends — each core’s recent load, current %, and trend arrow
- Top processes table — top 20 processes with PID, name, CPU%, memory usage, and memory%
Configuring the agent port
The agent listens on TCP port 3000 by default. You can override this via a CLI flag, a positional port argument, or an environment variable:
- CLI flag:
- socktop_agent --port 8080
- socktop_agent -p 8080
- Positional:
- socktop_agent 8080
- Environment variable:
- SOCKTOP_PORT=8080 socktop_agent
Help:
- socktop_agent --help
The TUI should point to ws://HOST:PORT/ws, e.g.:
- cargo run -p socktop -- ws://127.0.0.1:8080/ws
Keyboard Shortcuts
| Key | Action |
|---|---|
q or Esc |
Quit |
Security (optional token)
By default, the agent exposes metrics over an unauthenticated WebSocket. For untrusted networks, set an auth token and pass it in the client URL:
- Server:
- SOCKTOP_TOKEN=changeme socktop_agent --port 3000
- Client:
- socktop ws://HOST:3000/ws?token=changeme
Run socktop agent as a systemd service
Prerequisites
- systemd-based Linux
- Built or downloaded socktop_agent binary
- Port 3000 reachable (or adjust)
- Install the binary
# From your project root; adjust path to your built binary if needed
sudo install -o root -g root -m 0755 ./target/release/socktop_agent /usr/local/bin/socktop_agent
- Create a dedicated user
sudo groupadd --system socktop || true
# On Debian/Ubuntu the nologin shell is /usr/sbin/nologin; on RHEL/CentOS it may be /sbin/nologin
sudo useradd --system --gid socktop --create-home --home-dir /var/lib/socktop --shell /usr/sbin/nologin socktop || true
- Install the systemd unit
# Using the provided unit file from this repo
sudo install -o root -g root -m 0644 docs/socktop-agent.service /etc/systemd/system/socktop-agent.service
sudo systemctl daemon-reload
- Enable and start
sudo systemctl enable --now socktop-agent.service
- Verify it’s running
sudo systemctl status socktop-agent --no-pager
sudo journalctl -u socktop-agent -n 100 --no-pager

# Check the port
ss -ltnp | grep socktop_agent

# Or test locally (adjust if your agent exposes a different endpoint)
curl -v http://127.0.0.1:3000/ || true
- Configure authentication (optional)
# Add a token without editing the unit file directly
sudo systemctl edit socktop-agent
# Then add:
# [Service]
# Environment=SOCKTOP_TOKEN=your_strong_token

sudo systemctl daemon-reload
sudo systemctl restart socktop-agent
- Change the listen port (optional)
sudo systemctl edit socktop-agent
# Then add:
# [Service]
# ExecStart=
# ExecStart=/usr/local/bin/socktop_agent --port 8080

sudo systemctl daemon-reload
sudo systemctl restart socktop-agent
- Open the firewall (if applicable)
# UFW
sudo ufw allow 3000/tcp

# firewalld
sudo firewall-cmd --permanent --add-port=3000/tcp
sudo firewall-cmd --reload
- Uninstall
sudo systemctl disable --now socktop-agent
sudo rm -f /etc/systemd/system/socktop-agent.service
sudo systemctl daemon-reload
sudo rm -f /usr/local/bin/socktop_agent
sudo userdel -r socktop 2>/dev/null || true
sudo groupdel socktop 2>/dev/null || true
Platform notes
- Linux x86_64/AMD/Intel: fully supported.
- Raspberry Pi:
- 64-bit: rustup target add aarch64-unknown-linux-gnu; build on-device for simplicity.
- 32-bit: rustup target add armv7-unknown-linux-gnueabihf.
- Windows:
- TUI and agent build/run with stable Rust. Use PowerShell:
- cargo run -p socktop_agent -- --port 3000
- cargo run -p socktop -- ws://127.0.0.1:3000/ws
- CPU temperature may be unavailable; display will show N/A.
- TUI and agent build/run with stable Rust. Use PowerShell:
- MacOS
- Tested only on Mac/Intel currently
Using tmux to monitor multiple hosts
You can use tmux to show multiple socktop instances in a single terminal.
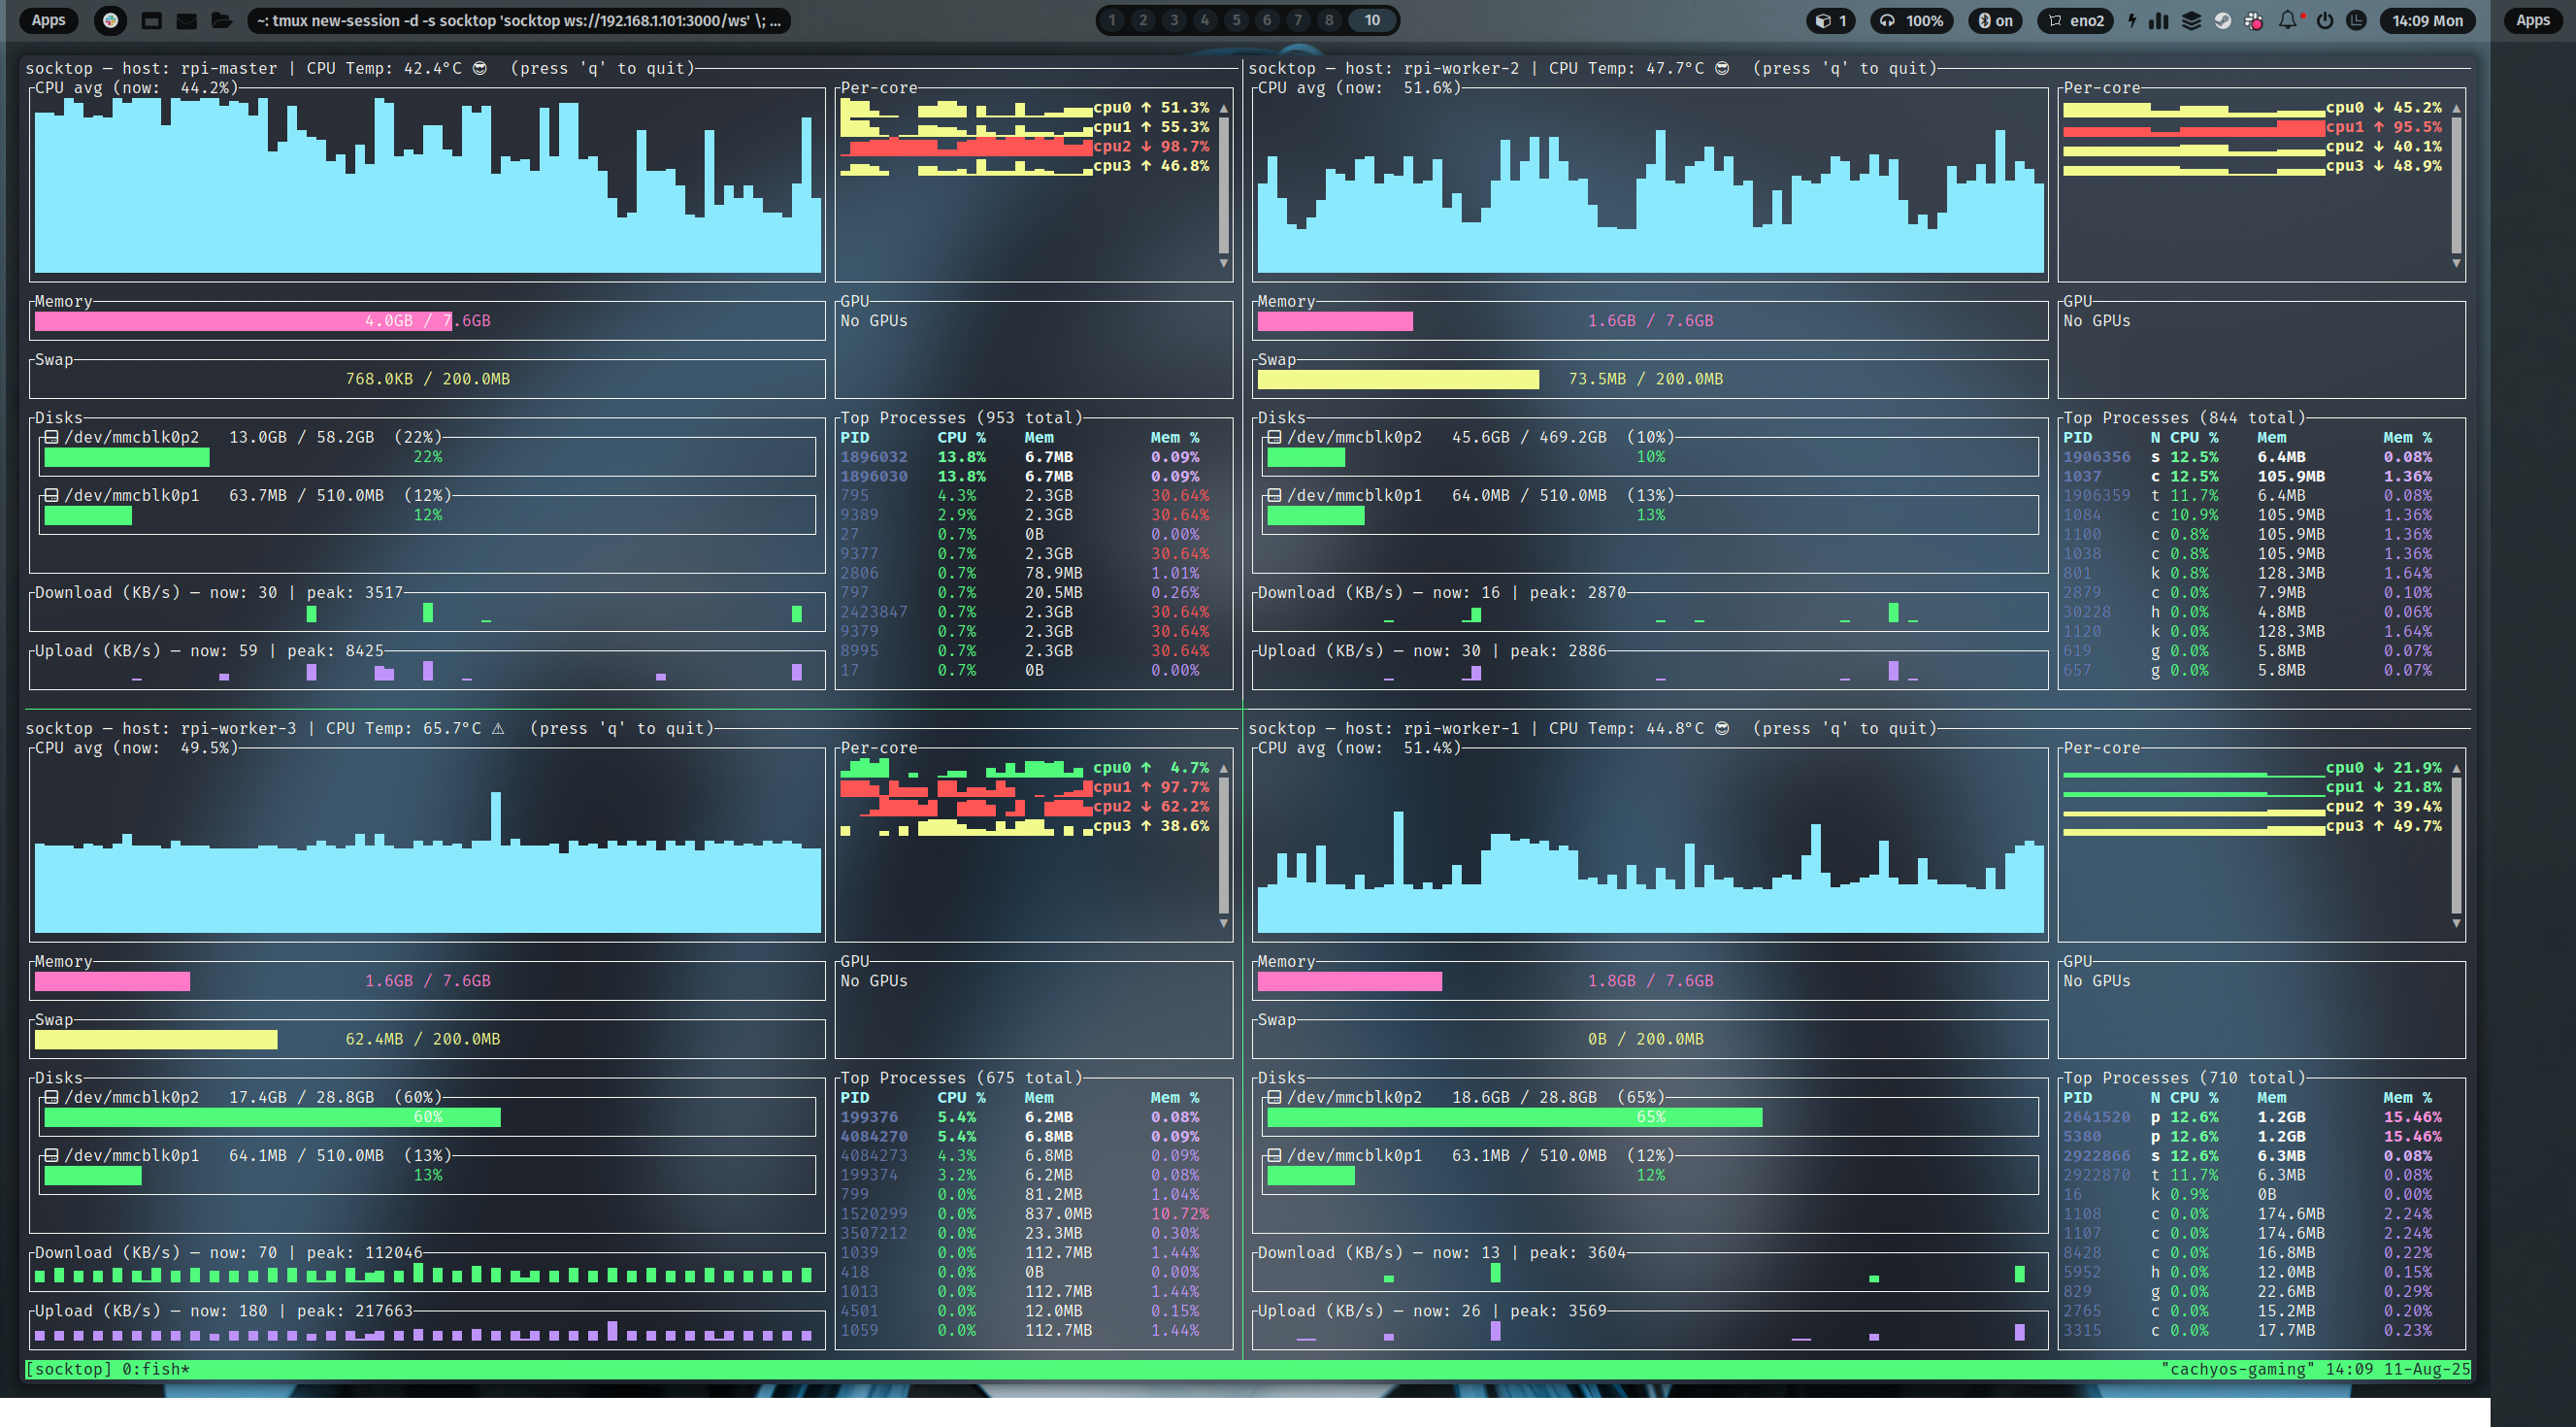 monitoring 4 Raspberry Pis using Tmux
Prerequisites:
- Install tmux (Ubuntu/Debian:
sudo apt-get install tmux)
Key bindings (defaults):
- Split left/right: Ctrl-b %
- Split top/bottom: Ctrl-b "
- Move between panes: Ctrl-b + Arrow keys
- Show pane numbers: Ctrl-b q
- Close a pane: Ctrl-b x
- Detach from session: Ctrl-b d
Two panes (left/right)
- This creates a session named "socktop", splits it horizontally, and starts two socktops.
tmux new-session -d -s socktop 'socktop ws://HOST1:3000/ws' \; \
  split-window -h 'socktop ws://HOST2:3000/ws' \; \
  select-layout even-horizontal \; \
  attach
Four panes (top-left, top-right, bottom-left, bottom-right)
- This creates a 2x2 grid with one socktop per pane.
tmux new-session -d -s socktop 'socktop ws://HOST1:3000/ws' \; \
  split-window -h 'socktop ws://HOST2:3000/ws' \; \
  select-pane -t 0 \; split-window -v 'socktop ws://HOST3:3000/ws' \; \
  select-pane -t 1 \; split-window -v 'socktop ws://HOST4:3000/ws' \; \
  select-layout tiled \; \
  attach
Tips:
- Replace HOST1..HOST4 (and ports) with your targets.
- Reattach later:
tmux attach -t socktop - Kill the session:
tmux kill-session -t socktop
Example agent JSON
socktop expects the agent to send metrics in this shape:
{
  "cpu_total": 12.4,
  "cpu_per_core": [11.2, 15.7, ...],
  "mem_total": 33554432,
  "mem_used": 18321408,
  "swap_total": 0,
  "swap_used": 0,
  "process_count": 127,
  "hostname": "myserver",
  "cpu_temp_c": 42.5,
  "disks": [{"name":"nvme0n1p2","total":512000000000,"available":320000000000}],
  "networks": [{"name":"eth0","received":12345678,"transmitted":87654321}],
  "top_processes": [
    {"pid":1234,"name":"nginx","cpu_usage":1.2,"mem_bytes":12345678}
  ]
}
Development
Run in debug mode:
cargo run -- ws://127.0.0.1:8080/ws
Code formatting & lint:
cargo fmt
cargo clippy
Roadmap
- Configurable refresh interval
- Filter/sort top processes in the TUI
- Export metrics to file
- TLS / WSS support
- [ x ] Agent authentication
- Split processed and jobs into seperate ws calls on different intervals
License
MIT License — see LICENSE.
Acknowledgements
ratatuifor terminal UI renderingsysinfofor system metricstokio-tungstenitefor WebSocket client/server